Dynamic Content 
Introduction 
Dynamic content is an exciting new functionality that enables powerful content customization. With dynamic content, you can send an email or generate a PDF document (requires PDF Add-On) with HTML formatted text displayed based on the field values.
For example, you can structure the Subject of your emails to display the appropriate user name, rather than hard-coding a particular value:
Thanks {{ Name }}, we have received your message!
Currently, this functionality is available in:
- Confirmation Messages
- Confirmation Emails and
- Email Notifications
Also, Dynamic Content is available in our Premium Add-Ons like Conditional Emails or PDF.
Variables 
You can insert variables into the email body, and they'll be replaced with whatever the user insert into that field.
To print a variable, it must be between double curly braces: {{ and }}. Eg. {{ My Variable }}
In the following example, we show two ways you can print variables:
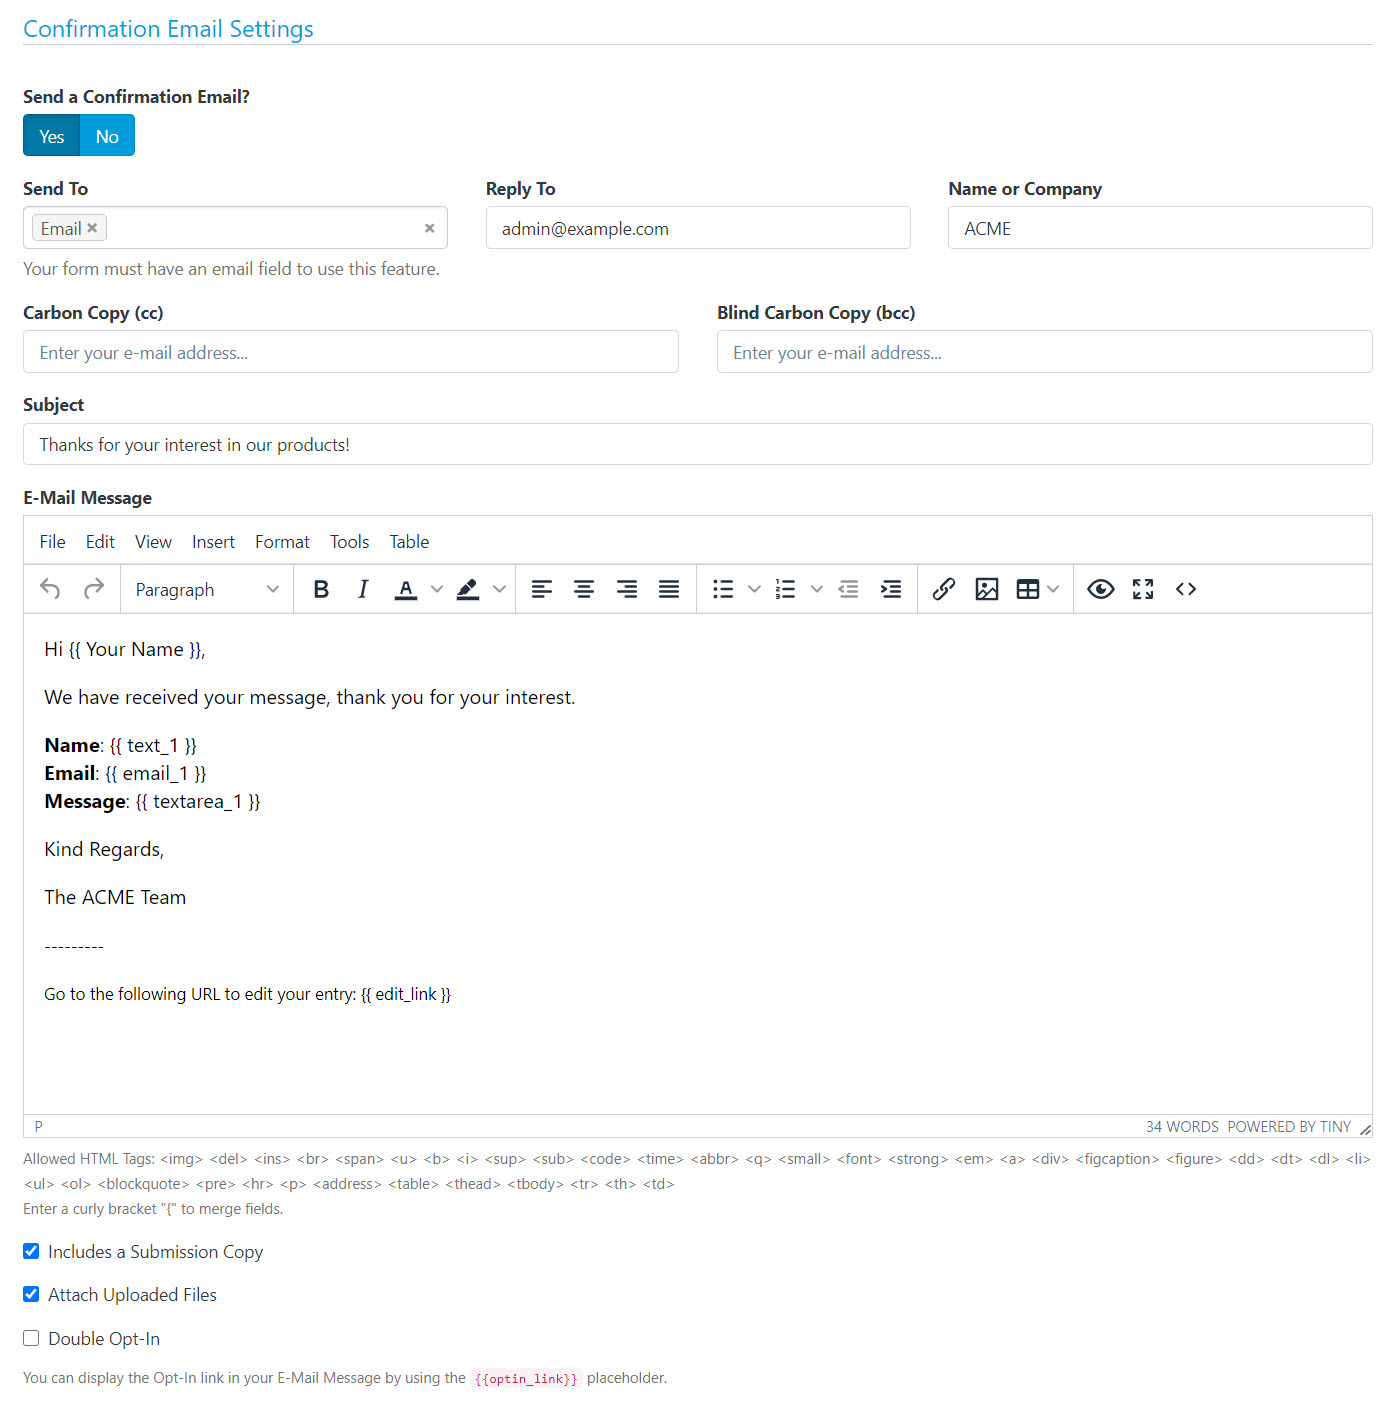
- By using the Field Label: The variable
{{ Your Name }}has been inserted to the confirmation email and will be replaced by the name the user puts in the Form. - By using the Field ID: You can use a Field ID as the variable name too, for example in the next image we use the following variable to print the Name of the user:
{{ text_1 }}at the same time we use{{ Your Name }}. In other words, we can use both types of variables to get the same field information. If your field doesn't have a label, this is the option you should use.
Additionally, you can use the following variables:
{{ form_id }}: Form ID.{{ form_hash_id }}: Form Hash ID{{ form_name }}: Form Name{{ submission_id }}: Submission ID{{ submission_number }}: Submission Number{{ submission_hash_id }}: Submission Hash ID{{ submission_table }}: The content of all the form fields (HTML format){{ submission_text }}: The content of all the form fields (Text format){{ created_at }}: Date of Submission{{ ip_address }}: IP Address.{{ user_agent }}: Browser’s User Agent of Sender.{{ url }}: Web page url where form has been embedded.{{ referrer }}: Web page url from where the visitor has arrived to the form.{{ country }}: Country of Sender.{{ city }}: City of Sender.{{ longitude }}: The geographic coordinate that specifies the east-west position of Sender.{{ latitude }}: The geographic coordinate that specifies the north–south position of Sender.{{ edit_link }}: To display the url to the Public Form Page to Edit a Submission. You should enable "Save to DB" & "Editable" to use this feature.{{ optin_link }}: To present the link to the Opt-In Confirmation Page. You should enable "Save to DB" to use this feature.
This is a great way to personalize your message. Any form field can be used in this way.
Auto-Suggest Tool 
"Form Settings", "Form Rules" and Premium Add-Ons allow the replacement of placeholders by data collected by your forms. To make things easier, we have implemented a visual tool that allows you to select form fields without remember them. To use this tool just enter a curly bracket "{", and the list of Form Fields will appear, select the desired field and ready.

Filters 
Filters allow change the output of a variable. It must be used after the variable and separated by a pipe "|".
Use Default Values 
For non-required fields, you can specify a default value to be used if it doesn't have any value.
Thanks {{ Name | default: "friend" }}, we have received your message!
For a user named John, this would read “Thanks John, we have received your message!”. However, if a submission didn't have a name, it would read “Thanks friend, we have received your message!”
Change Date Formats 
Converts a timestamp into another date format.
{{ created_at | date: "%a, %b %d, %y" }}
Output: Fri, Jul 17, 20
{{ created_at | date: "%Y" }}
Output: 2020
Use Timezone with Date Formats 
{{ created_at | timezone: "America/New_York" | date: "%Y-%m-%d %H:%M" }}
Output: 2020-07-17 01:00
Use Locale and Timezone with Date Formats 
Locales are named differently under Unix-based and Win32-based platforms.
{{ date_1 | locale: "en_US" | timezone: "America/New_York" | date: "%A, %B %d, %y" }}
Output: Monday, February 28, 22
For Linux:
{{ date_1 | locale: "es_ES" | timezone: "America/New_York" | date: "%A, %B %d, %y" }}
For Windows:
{{ date_1 | locale: "Spanish_Spain.1252" | timezone: "America/New_York" | date: "%A, %B %d, %y" }}
Output: lunes, febrero 28, 22
Url Encoding 
To print variables in urls (E.g. To redirect the user to another page) we suggest using the url_encode filter.
The url_encode filter converts any URL-unsafe characters in a string into percent-encoded characters. For example,
{{ "[email protected]" | url_encode }}
Output: john%40doe.com
New Line to Break filter 
In Textarea fields, newlines are saved as /n, if the text input and displayed in the foreground are both in textarea, there is no need to do any processing. The style you write in textarea will display correctly according to the style you submitted before.
However, if you need to display Textarea data as Dynamic Content you need to consider inserting an HTML line break (
) in front of each newline (\n) in a string.
{{ Your Message | newline_to_br }}
Output:
Dear ACME Team,
I am writing in reference to the current situation with the ABC Project. We have a number of questions which we hope you could answer...
Signature 
We can display a signature in different ways by using the signature filter, for example to display a:
- Signature as Raw Data (JSON string that includes the points to rebuild the signature)
{{ hidden_signature_1 }}
- Signature as Image (HTML img tag)
{{ hidden_signature_1 | signature }}
- Signature as Data URL (URL that can be inserted in the src attribute of an img tag)
{{ hidden_signature_1 | signature: 'data_url' }}
- Signature as Raw Data (Second option)
{{ hidden_signature_1 | signature: 'data' }}
- Signature as Image (Second option)
{{ hidden_signature_1 | signature: 'image' }}
Conditionals 
You can use conditional logic into your content. You may want to send the same email with differences for different groups. The most common use-case for this is language localization, where you want to send different content to different users.
Use Multiple Languages 
In the example below, if a user named John selects his preferred language as Spanish, he will see their message as “Hola, John!”
{% if Language == 'Spanish' %}
  Hola {{ Name }}!
{% elsif Language == 'French' %}
  Bonjour {{ Name }}!
{% else %}
  Hello {{ Name }}!
{% endif %}
Note: In this example, "Language" is the field label.
Show Images 
Another common use case is display multiple images uploaded by a same file field in different places. For that, you can do the following:
{% if file_1[0] %}
<div class="image-item-1">
    <img src="{{ file_1[0] }}" width="300" height="300" alt="First Image" />
</div>
{{% endif %}}
{% if file_1[1] %}
<div class="image-item-2">
    <img src="{{ file_1[1] }}" width="300" height="300" alt="Second Image" />
</div>
{{% endif %}}
Modifiers 
You can use modifiers into your content. For example, you may want to display the selected labels (not the values) of checkboxes, radio buttons or select lists. This is the most common use case and here we are going to describe how to make it.
Display Selected Labels 
In the example below, we are going to see how to display the selected country codes and selected country names of a Select List field.
In this example, the Select List field has the following options (Label|Value):
United States|US United Kingdom|UK France|FR Spain|ES
Now, when a form is submitted we can display the selected options in this way:
Selected country codes: {{ selectlist_1 }}
Output:
Selected country codes: US, FR, ES
Selected countries: {{ selectlist_1:label }}
Output:
Selected countries: United States, France, Spain