Email Setup 
- Introduction
- When does Easy Forms send an email?
- Site Emails
- How to set up the email sending?
- Configure access to your SMTP account
- Get an SMTP account
- Configure Asynchronous Email Notifications
- Brevo (Sendinblue) Integration
- SendGrid Integration
- Amazon SES Integration
- Customize the Email From Name (Sender Name)
- Send Test Email
Introduction 
This guide will explain several things you should consider when setting up your email account, whether you use your hosting's SMTP server, an external provider such as Gmail, Yahoo Mail or Outlook (Hotmail), or even PHP mail() function.
Note:
@apprefers to the application installation path.
When does Easy Forms send an email? 
It´s very important to know when Easy Forms send an email, because it will let you verify the application's correct functioning.
There are 5 actions or events that cause sending an email:
- When you received a Form Submission and your app need to send confirmations or notifications by email. This is the most common action why emails are sent, as each time a user makes use of your forms, it will be sending emails.
- When a registered user goes to Forgot Password and asks you to send an email with the instructions to recover his password.
- When a registered user accesses his account and change his email address. In this case, an email is sent to the new address to click on a confirmation link.
- When a registered user requests a confirmation email.
- When a user logs correctly (with a valid username and password), but his status is 'Inactive' (his email has not been confirmed); automatically will be sent an email confirmation.
Site Emails 
Easy Forms allows you to set 3 types of emails, each with a different use:
- Admin e-mail: Administrator's e-mail. Not used as the emails' sender. But, it can be used as notifications Reply-To (When a form is submitted).
- Support e-mail: Default sender of emails relate with Easy Forms' registered users managing. For example, to reset the password or to confirm an email, Support e-mail will be the sender of these emails. Additionally, it can be used as notifications Reply-To (When a form is submitted).
- No-reply e-mail: Default sender of sent emails when form's notification and/or confirmations are configured. It's used to send test emails too. And it can be used as notifications Reply-To (When a form is submitted).
Note: You must keep in mind that when a notification is configured, you can select a Form's Email field as Reply-To, to enable the notifications' recipient to easily reply these emails.
How to set up the email sending? 
The process to send emails depends on the setting you make. By default, we recommend the SMTP server configuration. However, we also offer integrations with popular email platforms like Amazon SES, Sendgrid or Brevo (Sendinblue).
Setting up emails with a SMTP server 
As hosting providers, SMTP providers also have restrictions that can affect the normal operation of Easy Forms. For example, Yahoo Mail requests that the sender of all emails must be the yahoo user or Gmail requires an App Password. However, you can use any of these services considering the following:
- By default, all emails are sent with the SMTP server Username as sender. But we recommend that both Support e-mail and No-reply e-mail match your SMTP server Username .
- Be careful when typing your password. By default, we hide it. But this is usually the most common reason why emails aren't sent.
- Be patient. Some suppliers will take several minutes to delivery the mail. In our tests, Gmail and Outlook were faster.
- Verify that the SMTP provider has not restricted access from your server. This can happen if for example, you always access your Hotmail account from country X and your hosting is in country Y.
The steps of the SMTP server settings are detailed below.
Set emails with a hosting provider 
When we talk about hosting providers, we must understand that there are a variety of services and each with different policies. So you need to start testing the configuration that offers you the best results.
For this example, we will make reference to Dreamhost, one of the most popular.
- Go to Dreamhost's Control Panel and create an email associated with the domain that hosts Easy Forms. For example, if Easy Forms is hosted on the example.com domain, create three emails: [email protected], [email protected] and [email protected].
- Go to Easy Forms
- Click on your username and then Settings
- Add the 3 emails in the proper fields.
- Click Save
Note: Both, the domain and username are for reference only, you might as well use a single e-mail in the three fields.
Important! Keep in mind, set these fields is very important for the proper delivery of emails, particularly Support and Non-Reply.
Send emails with the PHP mail() function 
Our current version does not support sending emails with PHP's mail() function. This feature has been discontinued for security reasons.
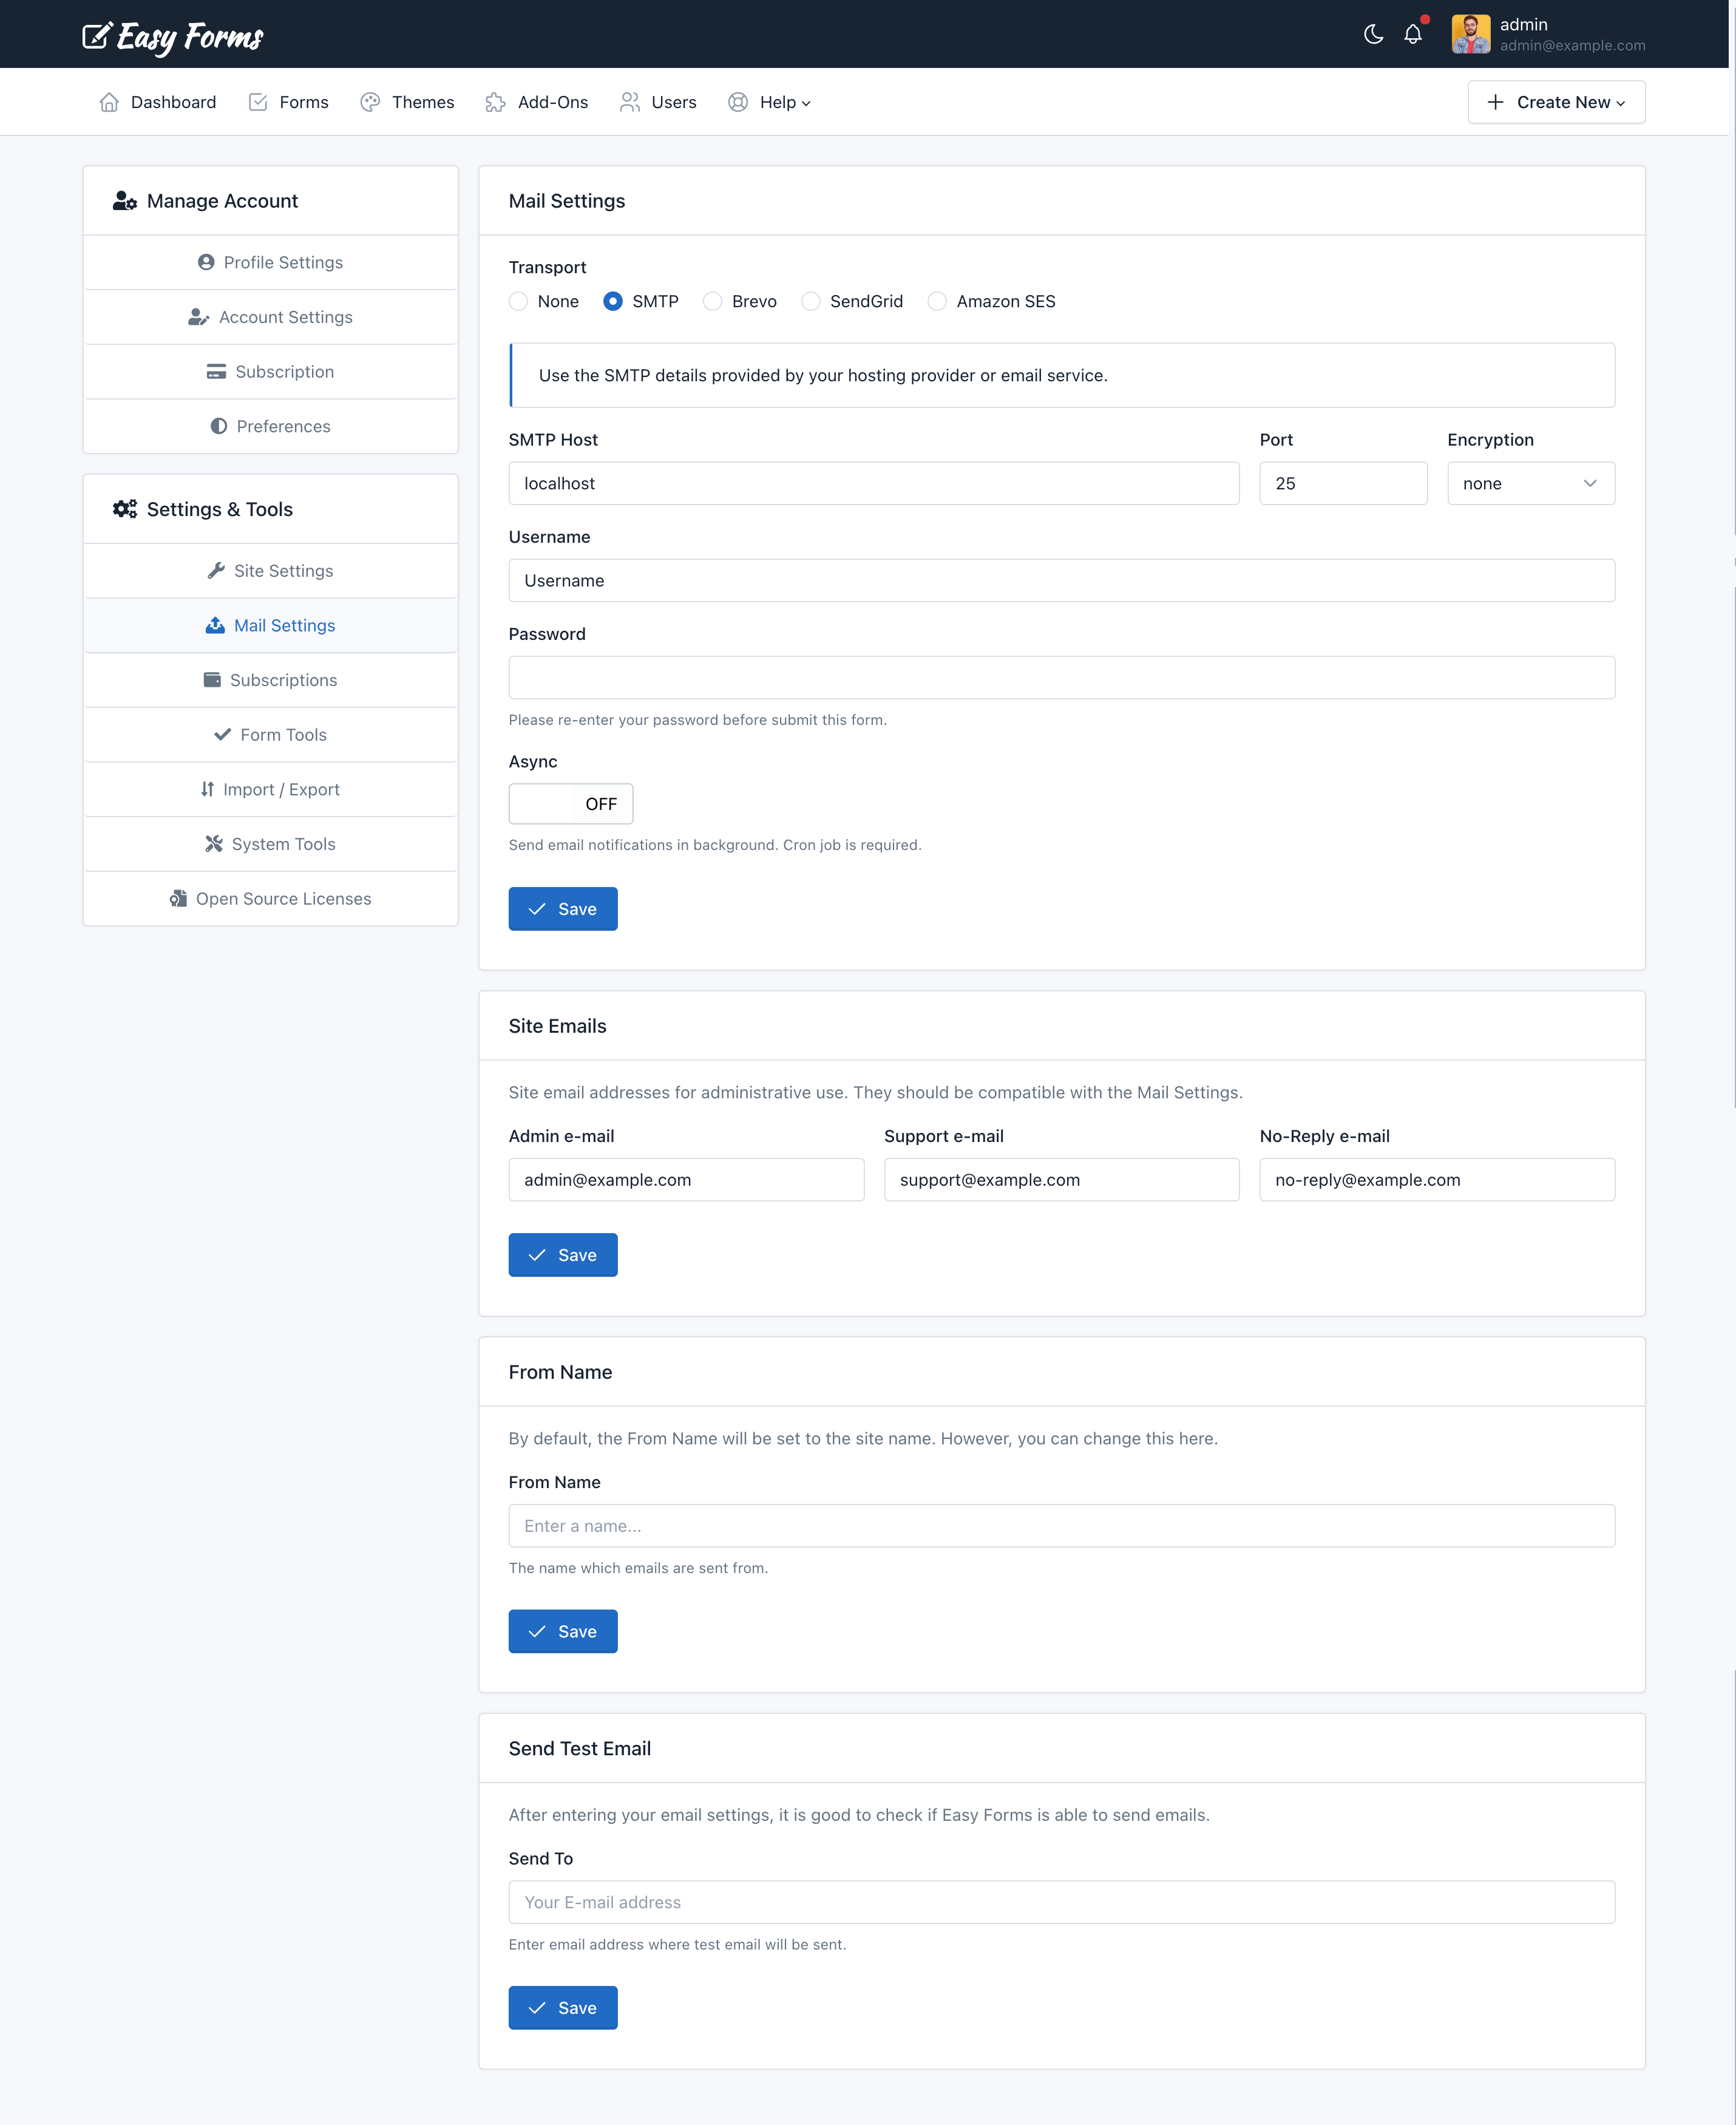
Configure access to your SMTP account 
Send emails by using the PHP native function - mail() - suffer from many drawbacks in terms of deliverability and security. Many anti-spam filters end up blocking these emails. To avoid this problem, you must configure an SMTP account in the application to send all mail through it.
To set up a SMTP account with Easy Forms you must follow these steps:
- Click on your username in the navigation menu.
- Click "Settings".
- In the lower left block, click "Mail Server"
- Choose "SMTP" and fill the fields with information of your SMTP account.
Get an SMTP account 
To find out Email Server Settings in cPanel, perform the following steps:
- Go to your cPanel
- Find the Mail section and Click Email Accounts
- From the list of email accounts locate the email account you require the server settings for.
- Click More followed by Configure Email Client.
- You must use the information under the heading Manual Settings (Non-SSL Settings)
On the other hand, we have checked the correct operation of Easy Forms with the configuration of the following SMTP servers:
Note: Please keep in mind that when using any free email account like Gmail, Yahoo Mail or Hotmail, there are limits that apply on the number of emails you are allowed to send daily.
Gmail
- Host: smtp.gmail.com
- Port: 587
- Encryption: TLS
Important! You must enable "Two-factor authentication" and create an App Password on your Google Account (Go to: https://myaccount.google.com/u/0/signinoptions/twosv and https://myaccount.google.com/apppasswords).
Outlook (Hotmail)
- Host: smtp-mail.outlook.com
- Port: 587
- Encryptation: TLS
Note: We recommend test the email sending and access your inbox in Outlook, to verify that Easy Forms access has not been restricted (Go to: https://account.live.com/activity)
Yahoo Mail
- Host: smtp.mail.yahoo.com
- Port: 465
- Encryptation: ssl
Note: According to our tests the Yahoo Mail delivery is successful, but it can take several minutes.
Configure Asynchronous Email Notifications 
This feature is only available when you send your emails through an SMTP account, since we have not detected any delay when we use other 3rd-party services.
To enable asynchronous email notifications you must follow the next steps:
- Click on your username in the navigation menu.
- Click "Settings".
- In the lower left block, click "Mail Settings"
- Choose "SMTP" and fill the fields with information of your SMTP account.
- Enable the Async option
From now all your emails will be queued, and a Cron Job will be in charge of sending. So if you want to use this feature without delays, be sure to run the application cron every minute.
Important! Asynchronous Email Notifications are sent by the Cron Job, so you must enable it first.
Changing the default Async value 
By default, the Async option has been disabled. However, if you are a developer, you can change its default value.
To change the default Async value, just follow the next steps:
- Open the file
@app/config/params.php. - Change the value of
'App.Mailer.async'to 1. - Save the file.
Note: Default values are overwritten when the Mail Server settings is saved using the user interface.
Brevo (Sendinblue) Integration 
Would you like to improve email deliverability? Brevo is super reliable and has a straightforward set up. Just go to your Brevo account -> Click your Username -> Click SMTP & API -> And copy the v3 Api Key.
To use your Brevo account to send all the transactional emails (e.g. Order confirmations, e-mail notifications or password reset):
- Click on your username in the navigation menu.
- Click "Settings".
- In the lower left block, click "Mail Settings"
- Choose "Brevo" and paste your v3 Api Key of Brevo account.
- Click "Save"
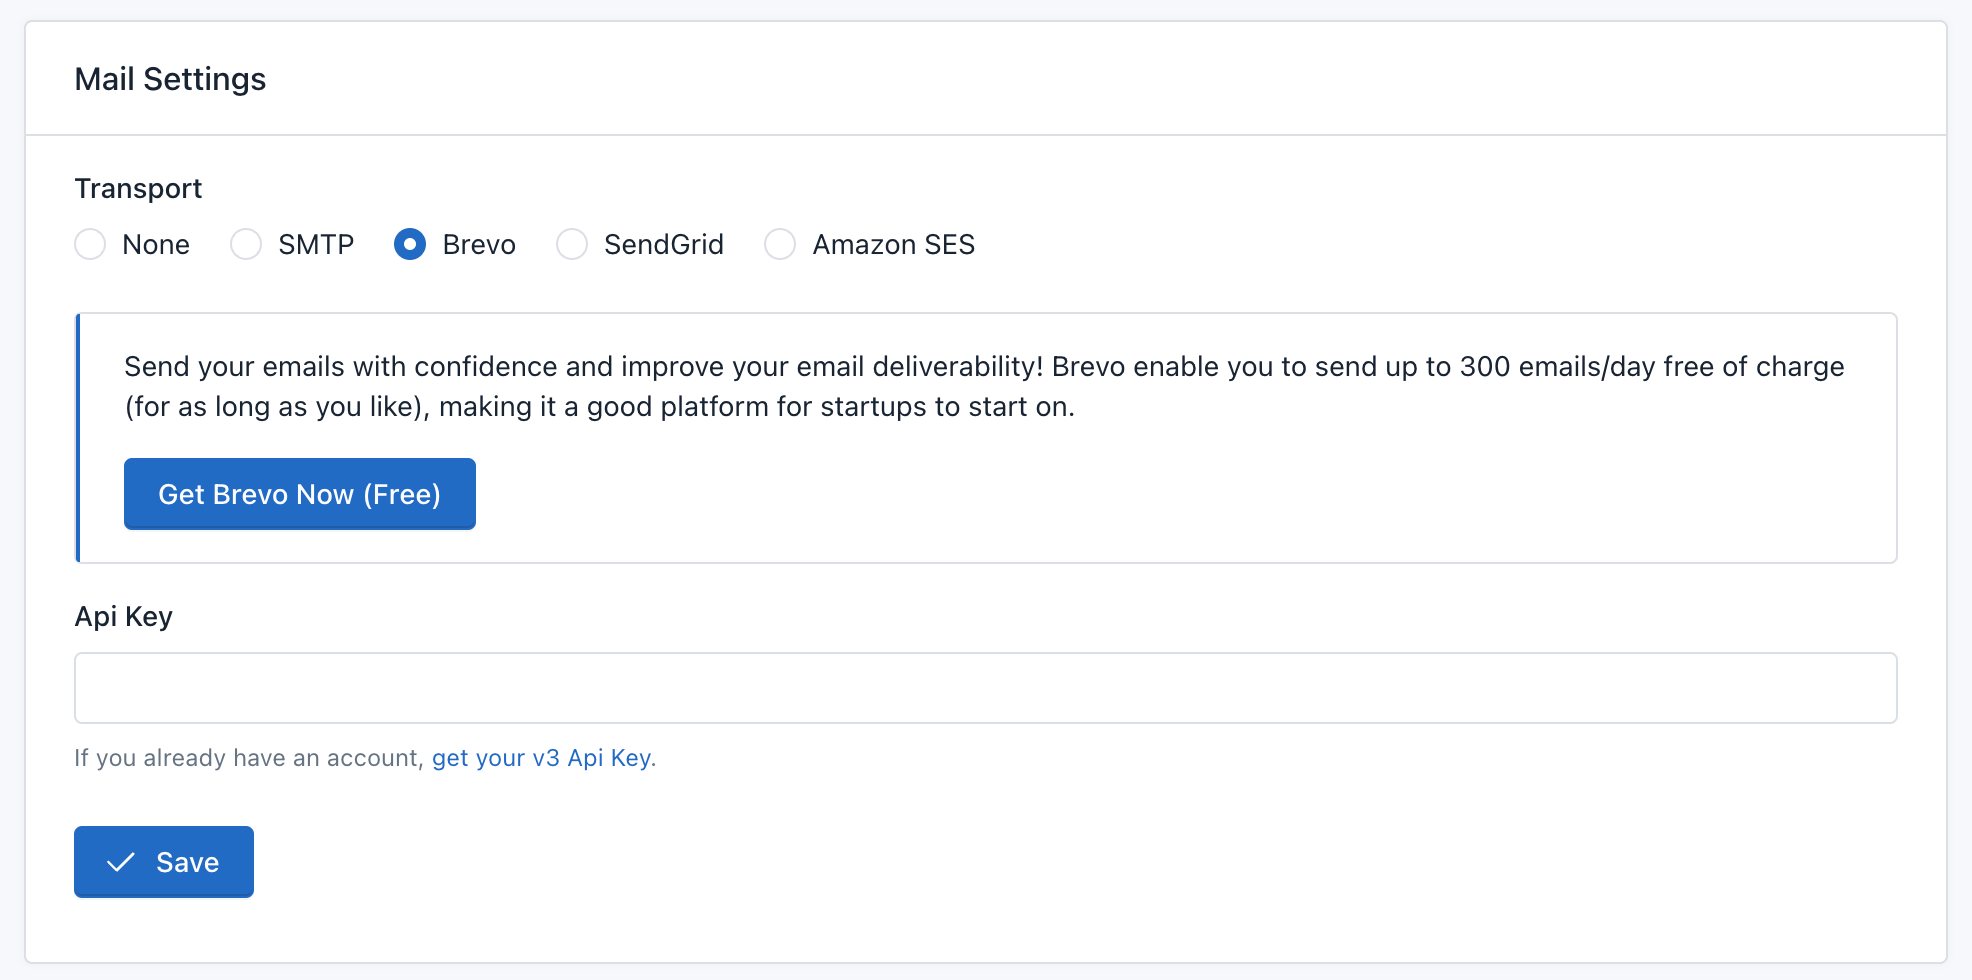
Note: The Brevo integration will not be able to work until you’ve completed the activation process. In order to activate your account, you’ll need to reach out to Brevo’s support team.
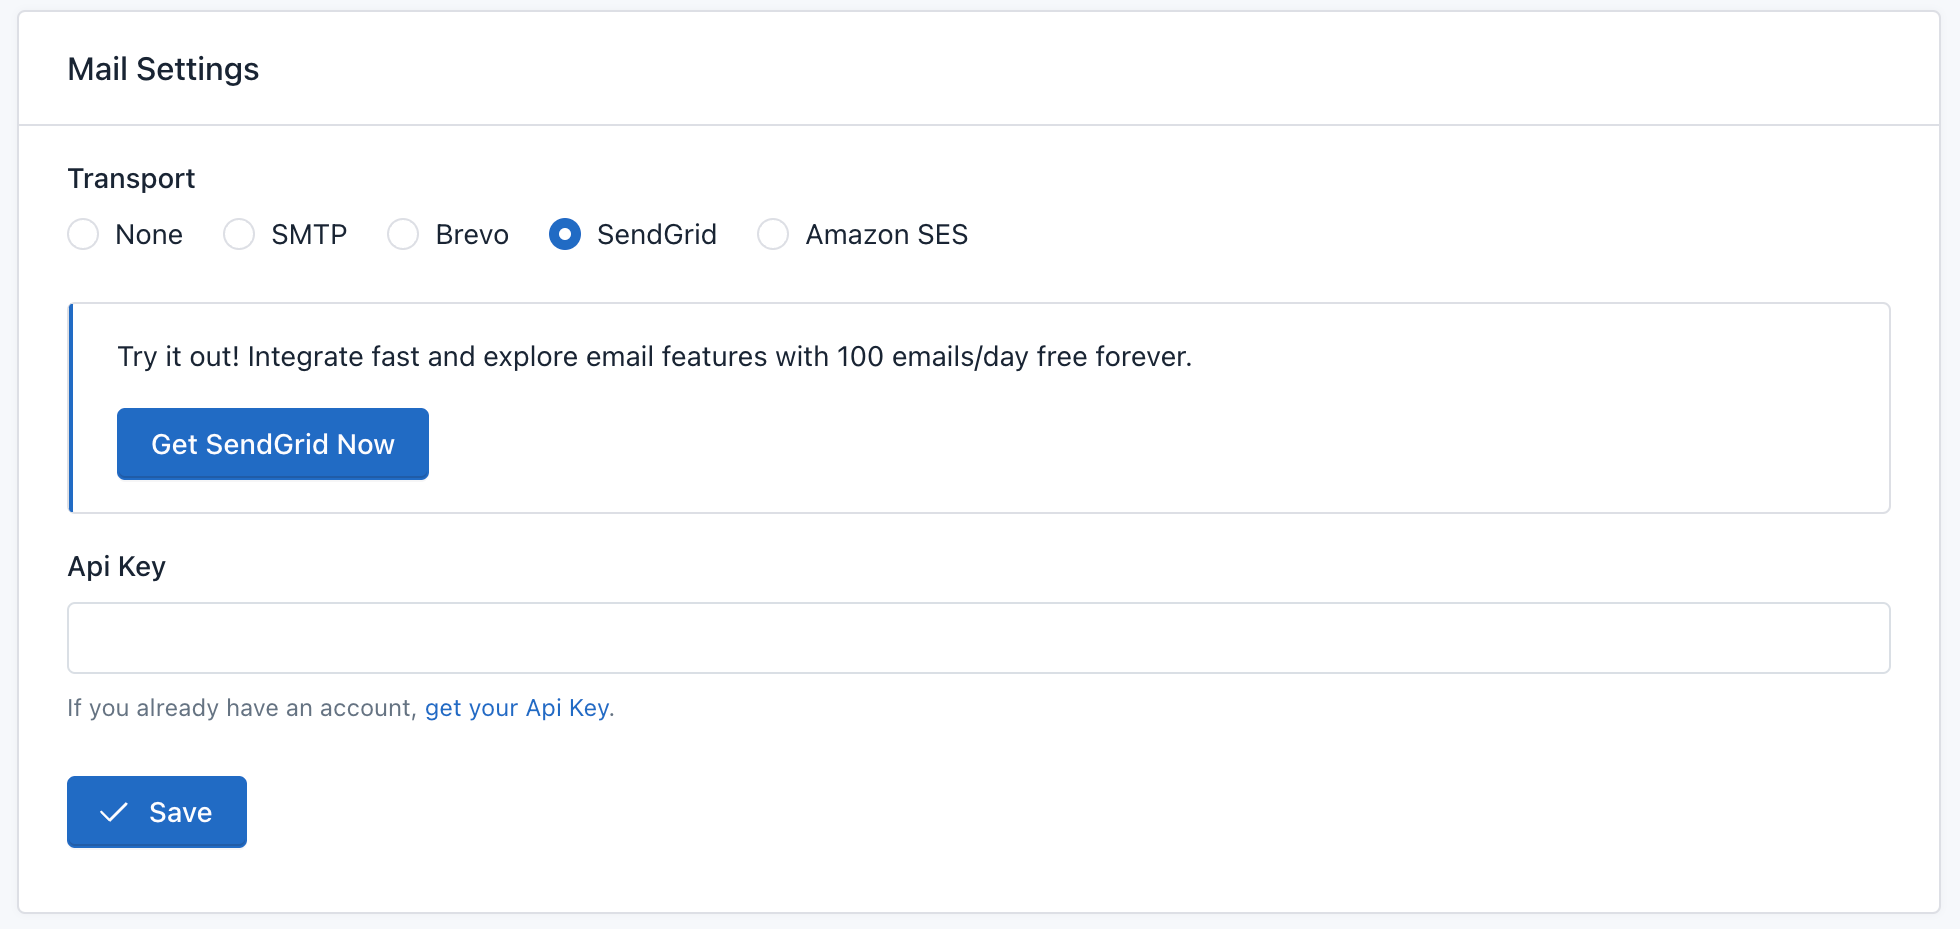
SendGrid Integration 
SendGrid is a popular service for improving email delivery. They offer an API which provides a more secure method than traditional SMTP services. SendGrid’s free plan allows your Easy Forms instance to send up to 100 emails per day.
To use SendGrid to send all the transactional emails, follow the next steps:
- Click on your username in the navigation menu.
- Click "Settings".
- In the lower left block, click "Mail Settings"
- Choose "SendGrid" and enter your SendGrid Api Key of your SendGrid account.
- Click "Save"
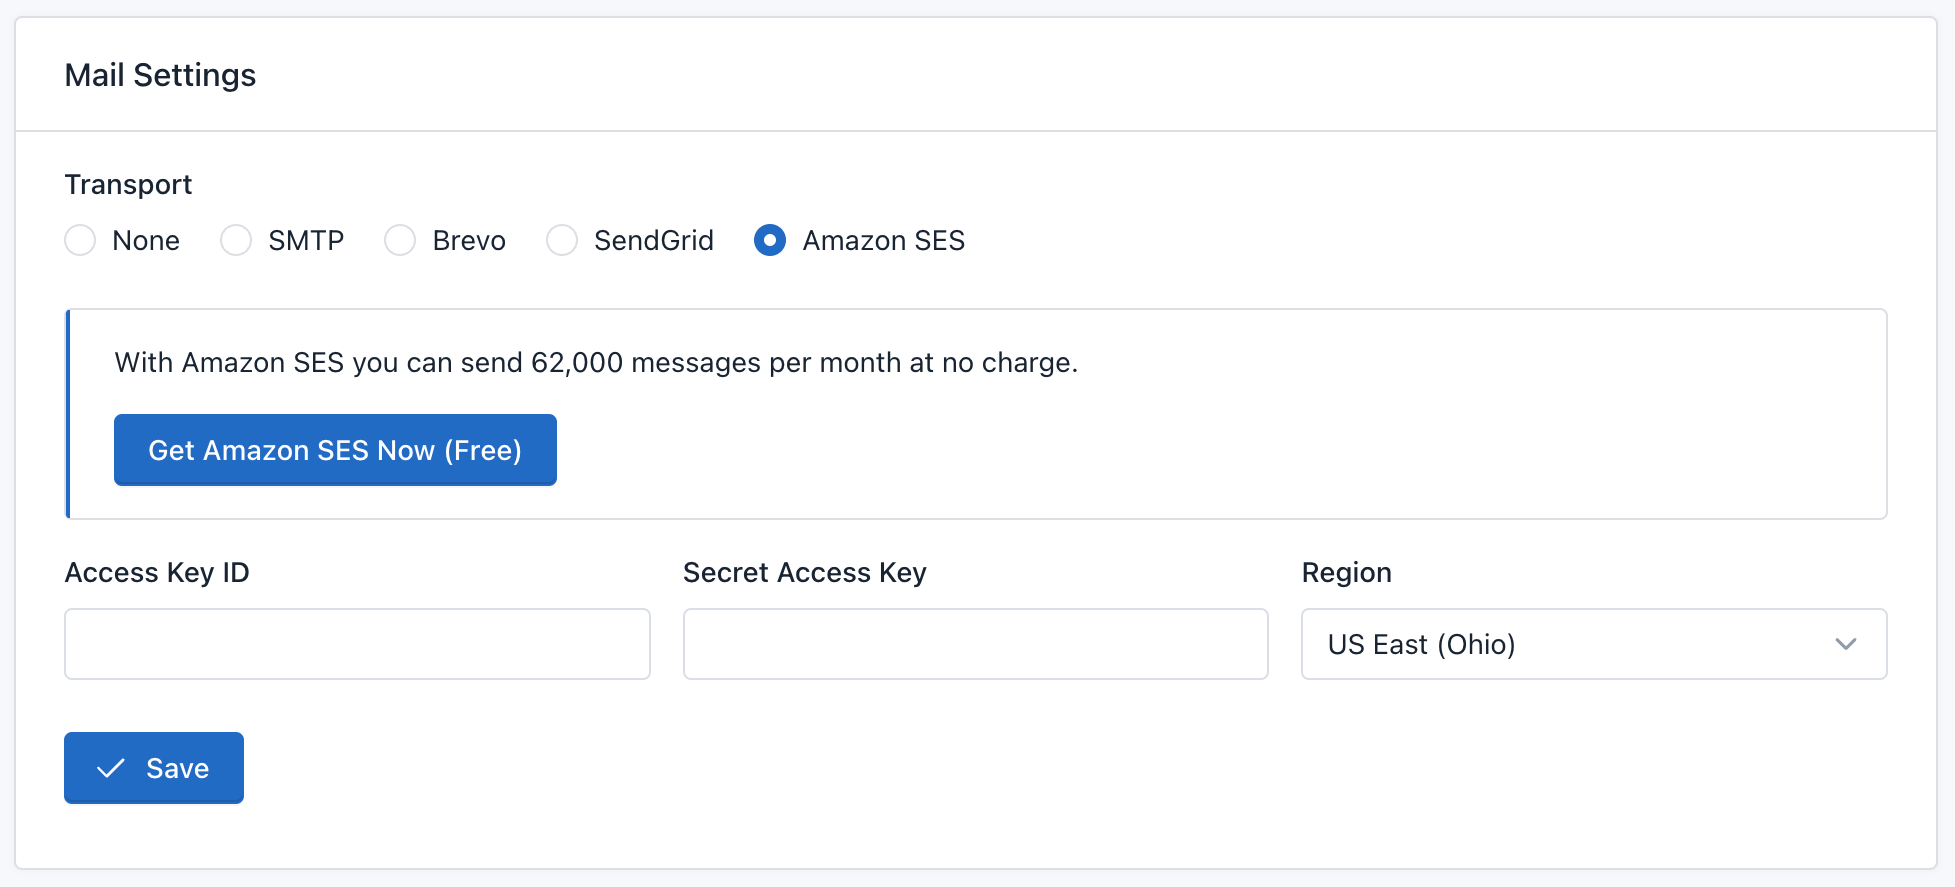
Amazon SES Integration 
Amazon Simple Email Service, or Amazon SES, is a powerful tool that’s commonly used for sending emails. To use Amazon SES to send all the transactional emails, follow the next steps:
- Click on your username in the navigation menu.
- Click "Settings".
- In the lower left block, click "Mail Settings"
- Choose "Amazon SES" and enter your Amazon Key ID, Secret Access Key and Region of your Amazon SES account.
- Click "Save"
Customize the Email From Name (Sender Name) 
From Name is the default sender name used by the application. If it's blank, we'll use the application name.
To set up the From Name of all the outgoing emails:
- Click on your username in the navigation menu.
- Click "Settings".
- In the lower left block, click "Mail Server"
- Go to the "From Name" panel and enter a name.
- Click "Save"
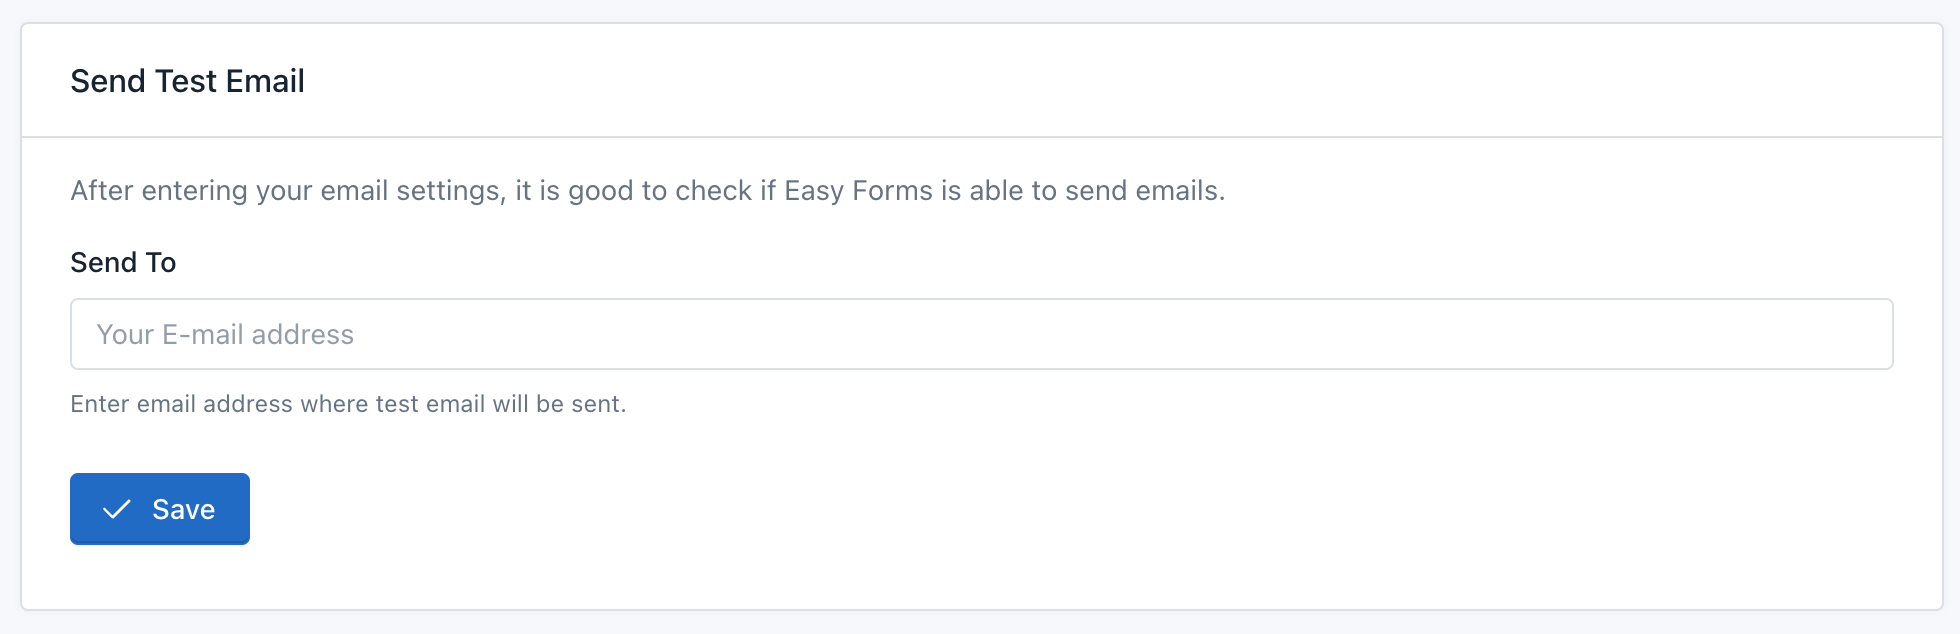
Send Test Email 
The final step is confirm that your Email Setup is working correctly. To test this out, go to "Send Test Email" panel on Mail Server settings page. Then, enter your email address and click the "Send Email" button.