Subscriptions Module (SaaS) 
Introduction 
The Subscriptions Module is a premium one, you can buy it on our landing page. Thank you!
The Easy Forms Subscriptions Module allows you to define subscription plans for Easy Forms and provides your customers with a convenient billing portal. From the billing portal, customers can subscribe to plans, update their plan, update their billing information, and download their receipts.
With this module you will be able to offer Easy Forms as a service (SaaS) to your clients.
Accept Recurring & One-Time Payments 
Monetise your application with a powerful billing system that accept monthly or yearly basis and one-time payments.
Secure Transactions 
Users can subscribe with PayPal or Stripe (Credit or debit cards including Visa, MasterCard and others) without leaving your site.
Change Subscriptions 
Let your users change their subscriptions at any time (Upgrade/Downgrade). Offer a preview of the prorated charge (stripe) or allow the change at the end of the billing cycle (paypal).
Cancel Subscriptions 
By default, subscriptions and billing continues until cancellation. Allow your users cancel their subscriptions at any time, at the end of the billing cycle or immediately.
Freemium or Free Trial 
Let users try out the software for an unlimited amount of time or create subscription plans with trial periods. Improve your conversions!
Track Payments & Download Receipts 
Track payments and allow your customers to download PDF copies of their receipts. One more thing you don’t have to worry about.
Feature Management 
Limits the number of forms to create and allowed submissions they can receive per month. Assign user roles automatically.
Beautiful Landing Page 
Start offering your service immediately! Get a beautiful landing page perfectly integrated into the application.
Installation 
The Subscriptions Module installing process is very simple, just follow the next steps:
Note: @app refers to the application root folder.
- Upload the "subscription.zip" file to the following folder:
@app/modules. Extract it and Delete it from your server. Now you should see the following file structure:@app/modules/subscription/Module.php - Open the
@app/config/web.phpfile with a text editor and find the line that says:// 'update' => ['class' => 'app\modules\update\Module'],and uncomment it by removing the ‘//’ characters, it should be similar to'update' => ['class' => 'app\modules\update\Module'], - Open your browser and go to your application with the
/updatepath. Eg.https://www.example.com/update - Follow the update process to install the database structure
- When you finish, open the
@app/config/web.phpfile again to revert the change and comment out the same line:// 'update' => ['class' => 'app\modules\update\Module'],
That's it!
Now you should see the following menu link.
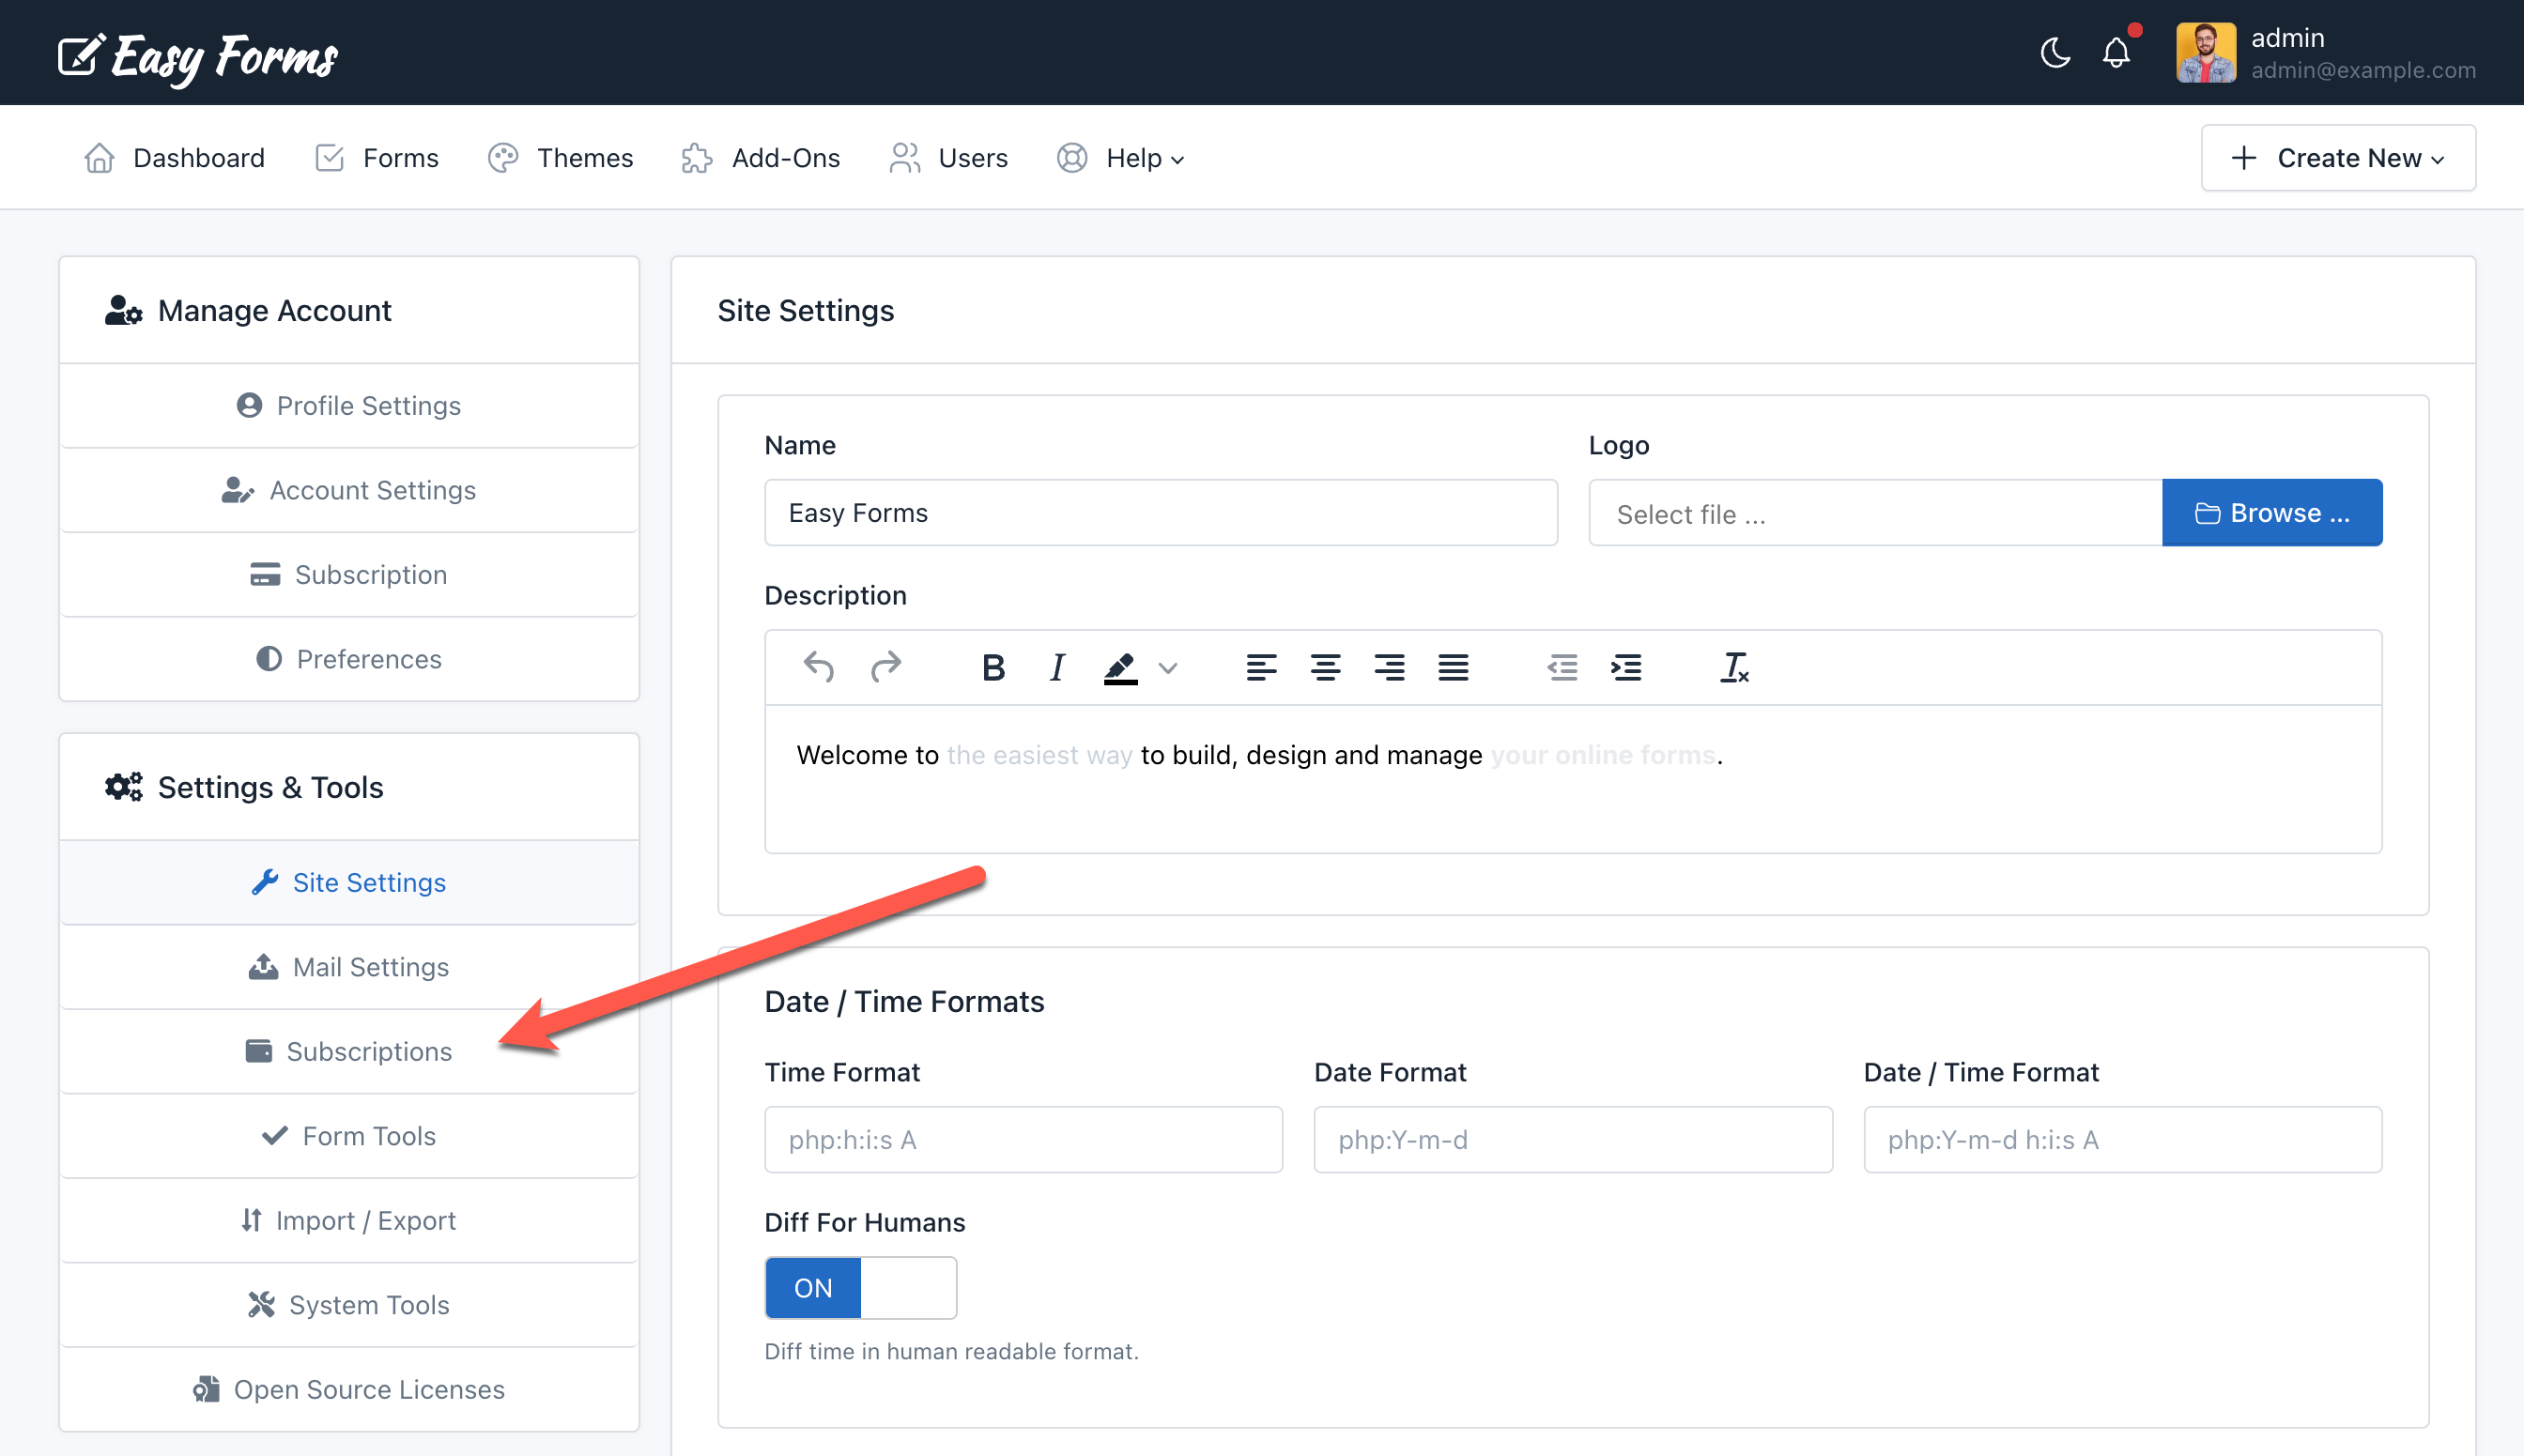
Click that link to open the Subscription Products' admin page.

In this page you will see the button to "Add a Subscription Product", and the Subscriptions' Global Settings link.
Update Process 
To update the Subscriptions module, just follow these steps:
Important! Make a DB backup before to begin the update process.
Note:
@apprefers to the application root folder.
Steps:
- Remove the @app/modules folder (you can place it outside the application as backup).
- Upload the "subscription.zip" file to the following folder:
@app/modules - Extract the "subscription.zip" file and delete it from your server. Now you should see the following file structure:
@app/modules/subscription/Module.php - Run Update Script
- Visit
http://www.example.com/updateorhttp://www.example.com/index.php?r=update(replacewww.example.comwith your domain). - If you can't access the update script:
- Open
config/web.phpwith a text editor. - Uncomment the line:
'update' => ['class' => 'app\modules\update\Module'], - Run the Update script.
- After the update, comment out the same line again.
- Open
- Visit
- Verify Update
- Try running the update script again. You should see a 'Page not found' error message.
And that’s it! The update is now complete. Your updated Subscriptions module is now ready to use. Enjoy!
Global Settings 
In this page you will see different panels where you can configure the payment environment, default user limits, enter your company information that will be displayed with the receipts, configure the payment gateways and define the environment (sandbox or live). These data are required to generate receipts and accept payments.
Environment 
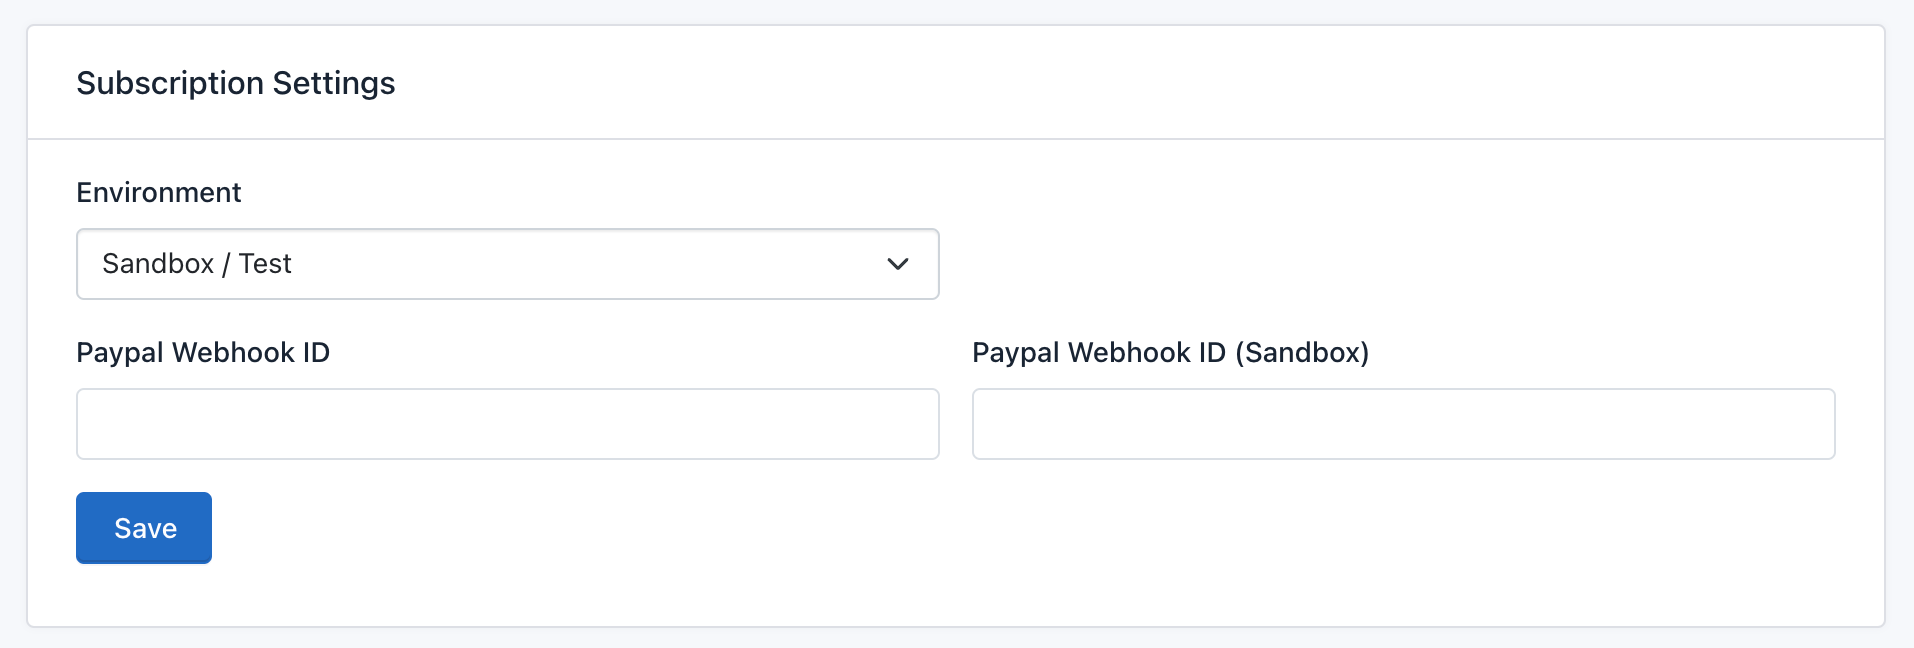
- Environment: Select the environment for the 3rd party billing service (PayPal and Stripe).
- PayPal Webhook ID: Go to the PayPal Developer Control Panel > My Apps & Credentials > Live > Click your REST API App Name > Webhooks > Copy Webhook ID.
- PayPal Webhook ID (Sandbox): Go to the PayPal Developer Control Panel > My Apps & Credentials > Sandbox > Click your REST API App Name > Sandbox Webhooks > Copy Webhook ID.
Default User Limits 
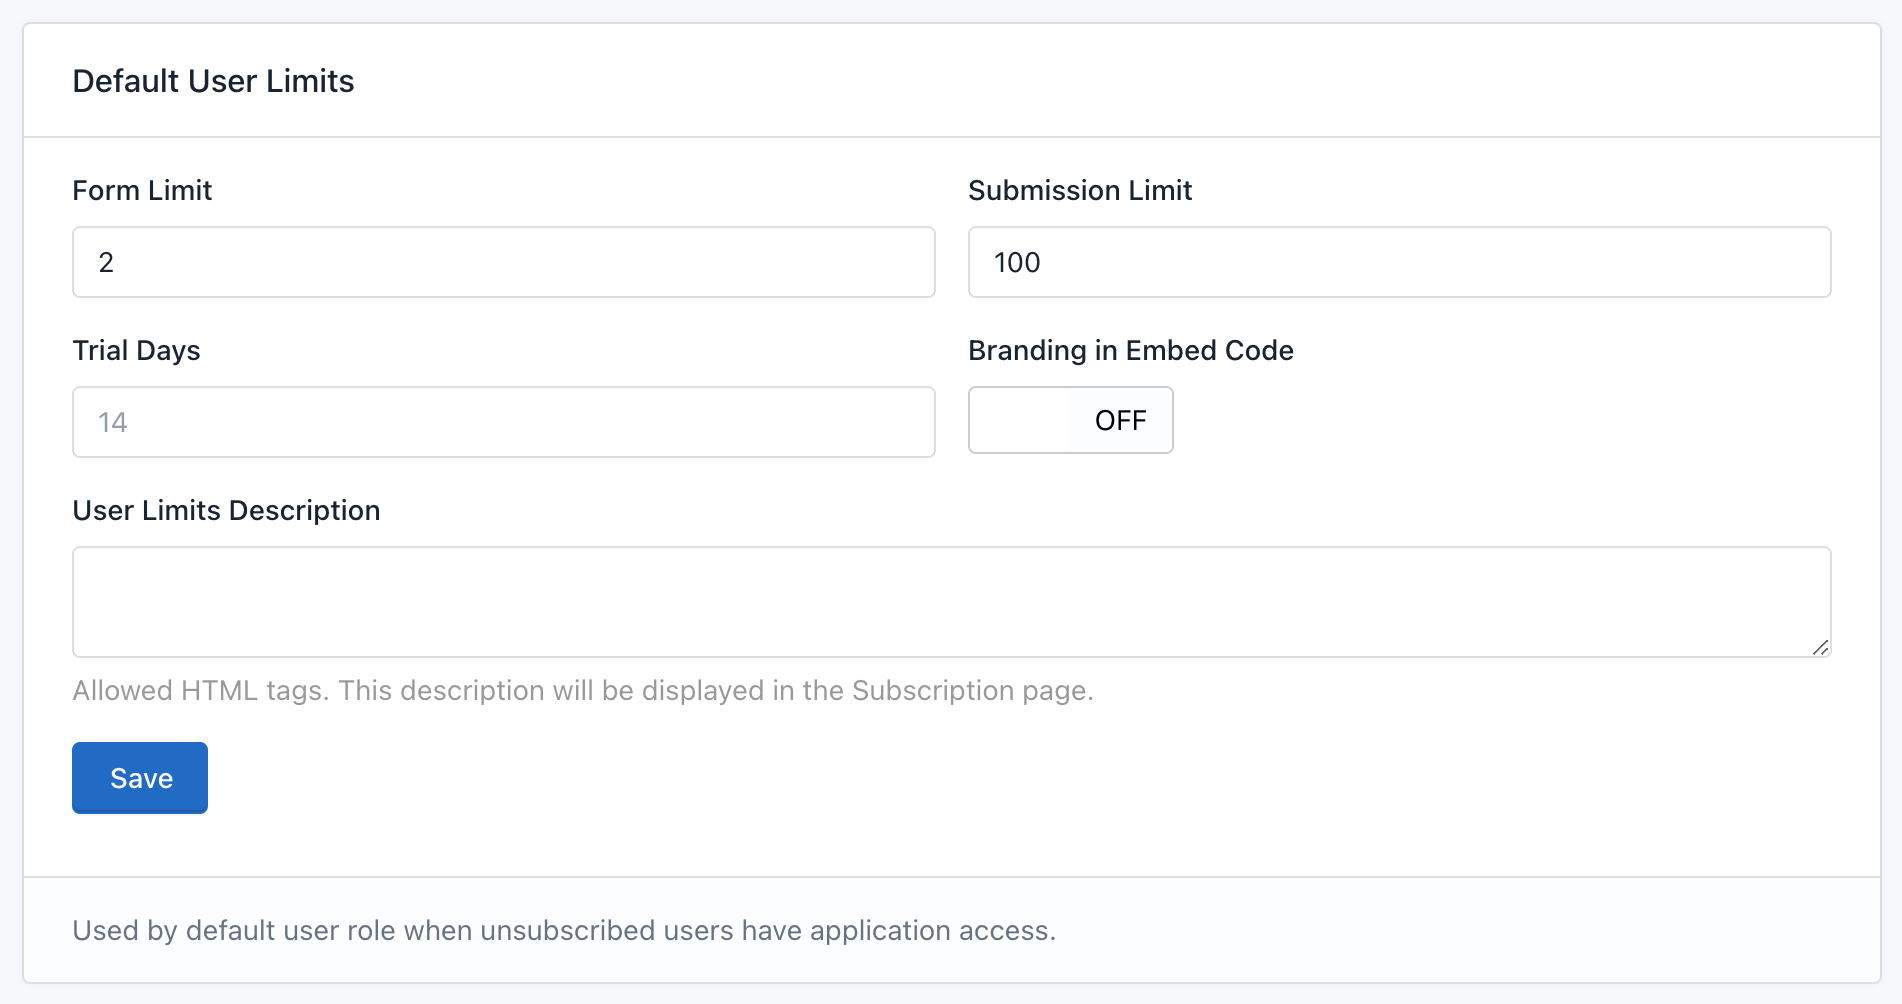
This information is used by users with the default user role when unsubscribed users (Free users) access the application. You can select the Default User Role in Site Settings > Membership.
- Form Limit: It's the number of forms that a user with the default user role can create or have into the application.
- Submission Limit: It's the number of entries that a user with the default user role can collect or have during a month.
- Trial Days: It's the number of days that a user can maintain the default user role. When the trial period has expired, the user will lose the default user role and all the forms they have created will be disabled. The trial period is verified each time the user logs into the application and each time one of its forms is submitted.
Company Information 
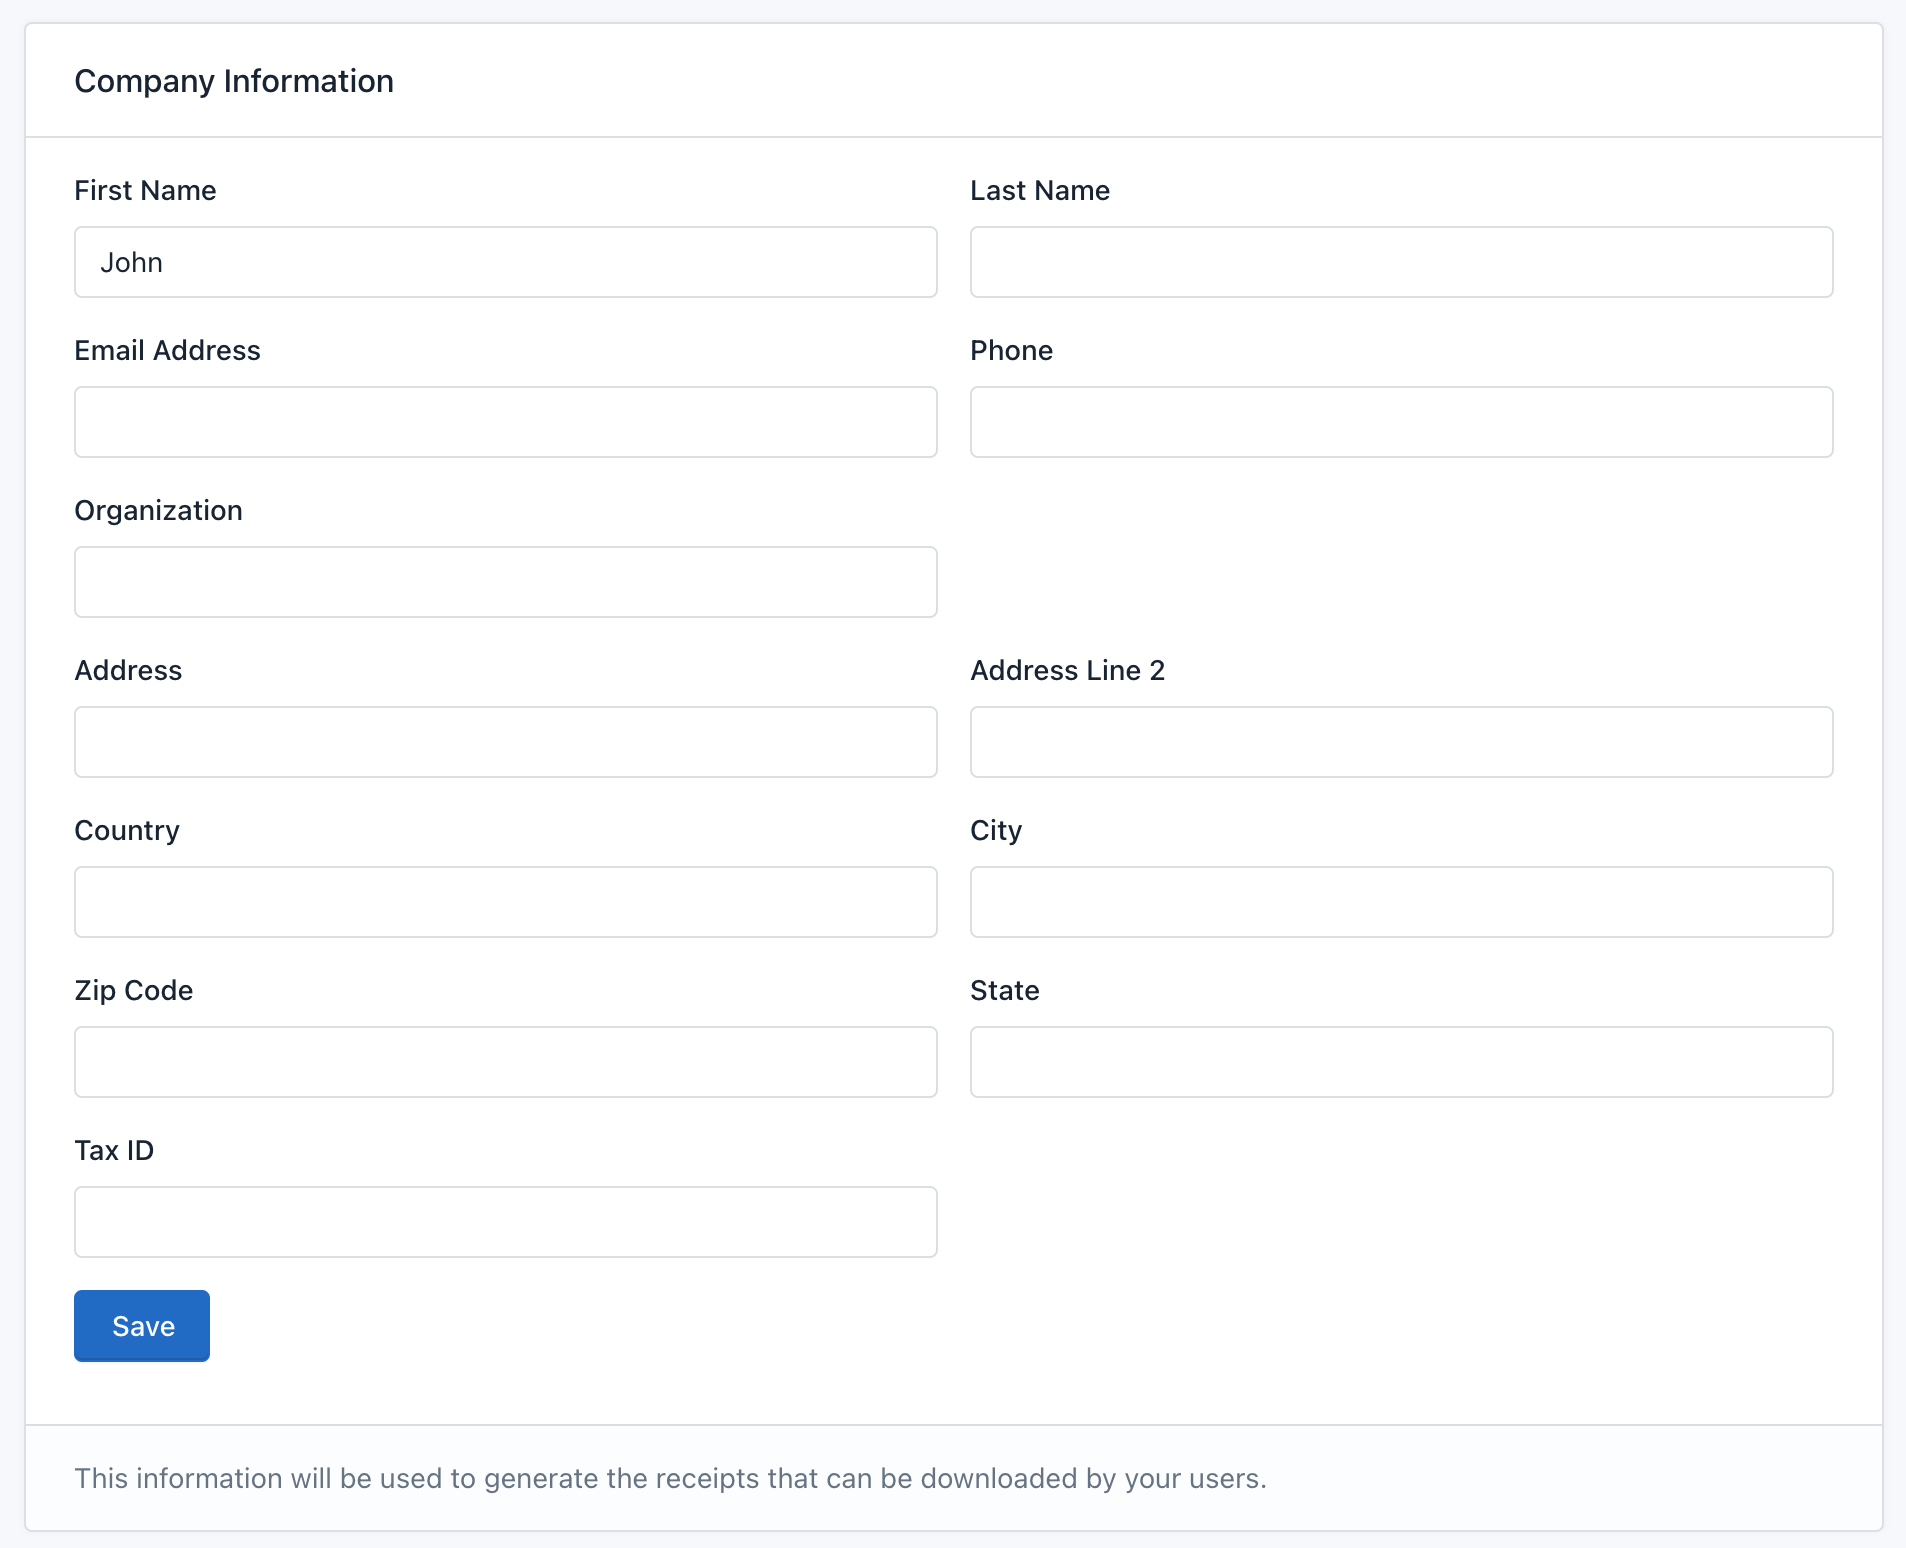
This information is used to generate the receipts that will be downloaded by the users. In this section, you can enter your name, address and tax id.
Payment Gateways 
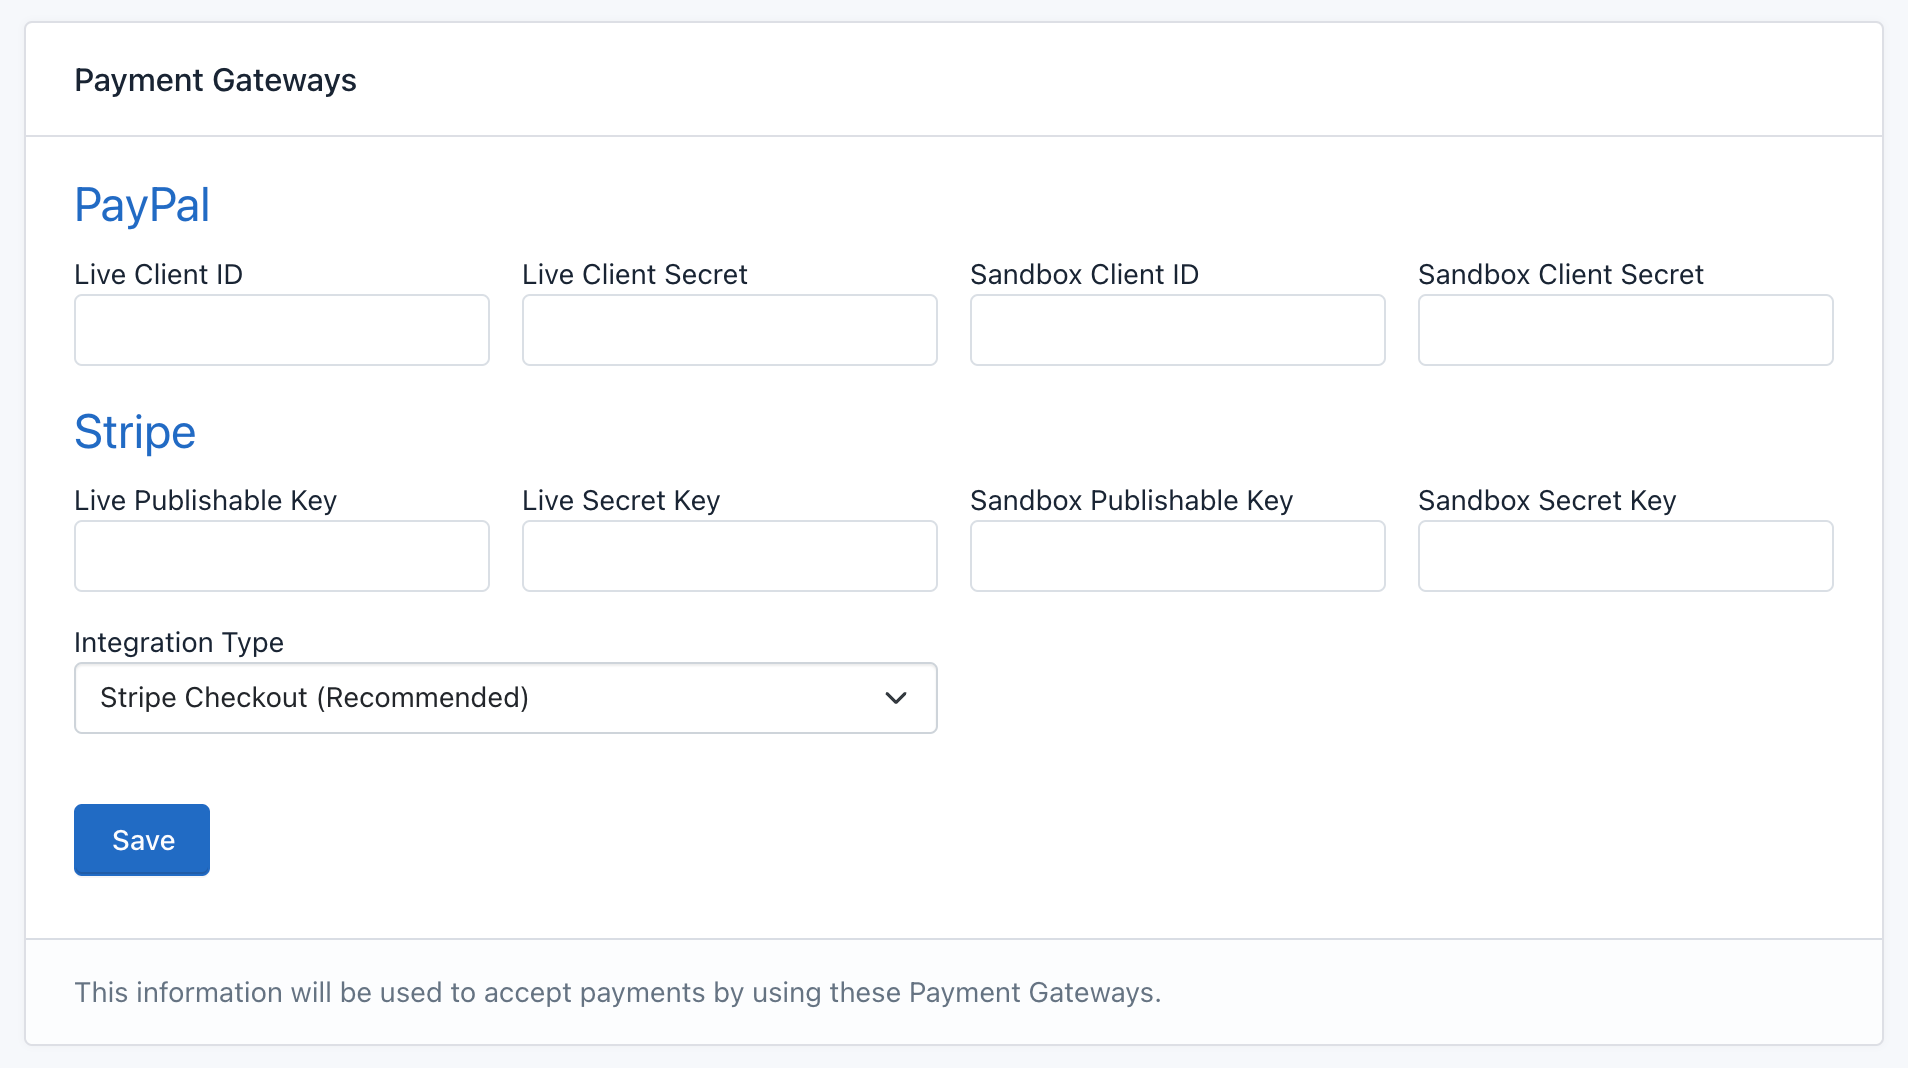
In this section you should enter your PayPal & Stripe API keys. To generate your API credentials for the sandbox/test and live/production environments follow these steps:
PayPal Webhooks 
In addition, your application will need to receive webhooks from PayPal in order to keep your application's billing and subscription data in sync with PayPal. Within your PayPal Developer dashboard webhook management panel, you should configure PayPal to send webhook alerts to your application's /subscription/webhook/handle-paypal-webhook URI. You should enable webhook alerts to receive all events.
Stripe Webhooks 
In addition, your application will need to receive webhooks from Stripe in order to keep your application's billing and subscription data in sync with Stripe's. Within your Stripe dashboard's webhook management panel, you should configure Stripe to send webhook alerts to your application's /subscription/webhook/handle-stripe-webhook URI. You should enable webhook alerts to receive all events.
Customer Acquisition Model 
SaaS applications usually offer one of the following ways to let users test the application before paying to use it. Easy Forms supports the following customer acquisition models:
1. Freemium (for ever). The user will be able to use the application forever, but his account will be limited to a minimum set of features. To get more features he will need to subscribe a plan.
To implement this model with Easy Forms, Go to Site Settings> Default User Role. Select a role with the most limited features.
That's all!
Just keep in mind that you should not define any trial period, neither in Subscriptions > Global Settings nor in Product > Pricing Plans.
2. Trial Period (without subscription). The user will be able to use the application without limits but for a limited period of time. This will allow him to test all the features so that he can choose which plan is the best for him.
To implement this model with Easy Forms, Go to Site Settings > Default User Role. Select a role with full features. Then Go to Subscriptions > Global Settings > Default User Limits > Trial Days. Enter the number of days (e.g. 14). After this period of time, the user will lose the assigned role. To get it back, he will need to subscribe a plan.
3. Trial Period (with subscription). The user must subscribe a pricing plan in order to use the application. Usually, each plan will offer a trial period so that the user can test the application. If the user decides not to cancel their subscription, at the end of the trial period the first payment will be made automatically.
To implement this model with Easy Forms, Go to Subscriptions > Actions > Update > Enter the Trial Days on each Pricing plan. Take into account that these days should be defined in PayPal and Stripe to keep the compatibility because the Payment Gateway will be in charge of the billing process.
Important! Never link a subscription plan to the default user role. Since we need this role to be kept free to be able to modify the permissions, the trial period and the limitations at any time.
Product & Pricing Plans 
In Easy Forms you can create a product and associate one or more prices to that product. The product is the set of features that the user will receive when subscribing and can have different pricing plans (Eg. monthly or annual).
To link the Easy Forms price plans with the pricing plans defined in Stripe and PayPal, you must copy the Plan IDs of the payment gateways.
How to create a Subscription Product on PayPal 
It is important that in PayPal you only create one product, since PayPal allows you to switch between price plans for the same product. The organization of pricing plans in Easy Forms is different, since we can create different Products (To associate each product with different user roles and limits).
Important! It must be taken into account that in PayPal the name and id of each product and plan cannot be changed later.
So, in PayPal you must create:
Product. For example:
- Name: Easy Forms (Use the name of your application)
- ID: online_form_builder
- Description: Online Form Builder
Pricing Plans: Fixed Pricing. For example:
- Basic Plan / Monthly
- Basic Plan / Yearly
- Advanced Plan / Monthly
- Advanced Plan / Yearly
Note: The name of the plans are visible by users at the time of the subscription.
Also, each plans can have a different price and, you can create as many plans as you consider necessary. Keep in mind that only recurring payments can be created in this way.
To create your product and pricing plans in PayPal, follow these steps:
How to create a Subscription Product on Stripe 
It is important that in Stripe you only create one product, since Stripe allows you to switch between price plans for the same product. The organization of pricing plans in Easy Forms is different, since we can create different Products (To associate each product with different user roles and limits).
Note: In Stripe you should select "Standard Pricing" > Recurring, to charge the same price for each billing period.
To create your product and pricing plans in Stripe, follow these steps:
Create a Product 
To create a subscription product in Easy Forms, go to Site Settings > Subscriptions and follow the next steps:
- Click Add Product
- Enter a Name and Description.
- Details: Enter one detail per line (Eg. 5 forms). This will be used to generate the pricing table in the Landing page and Subscription page.
- Select the Roles (Permissions) that the subscribed users will have during their subscriptions.
- Select the Status ON to keep this product enabled.
- Select the Recommended ON to keep this product recommended in the pricing table.
- Form Limit: Enter the max number of forms that a user can create. Eg. 5
- Submission Limit: Enter the max number of submissions that a user can collect during a month. Eg. 100
Pricing Plans 
A pricing plan should be compatible with the pricing plans you created on Stripe and PayPal.
- Name
- Description
- PayPal Plan ID
- PayPal Plan ID (Sandbox)
- Stripe Price ID
- Stripe Price ID (Test)
- Amount: In cents (e.g. 500). It will be converted to 5.00
- Currency
- Type: Recurring or One-Time.
- Number of intervals: If the type is recurring, it means the duration of the billing cycle. If the type is one-time, it means the duration of the subscription. E.g. 1
- Interval: It can be Day, Week, Month or Year. Usually you will select Month (Monthly plans) and Year (Yearly plans).
- Trial Period Days: Only if your PayPal plan and Stripe plan have a trial. Usually you don't want to use it if you are going to offer free plans (Freemium), because it is set in Subscriptions > Global Settings > Default User Limits > Trial Days.
Pricing Plans of One-Time Payment 
In the same way that we have created the recurring payment plans; to create single payment plans, you only have to modify the type, number of intervals and the time interval. Let's look at some examples:
Single payment plan valid for a period of 6 months:

Type: One-Time.
Number of intervals: 6
Interval: Month
Single payment plan valid for a period of 1 year:

Type: One-Time.
Number of intervals: 1
Interval: Year
Update a Product 
You can update a subscription product at any time. Take into account that any change won't be replicated in PayPal or Stripe. So first, you should update any change on the Payment Gateway, and then update your Easy Forms plan to keep the compatibility.
To update a subscription product in Easy Forms, go to Site Settings > Subscriptions > Actions > Update.
Delete a Product 
To delete a subscription product in Easy Forms, go to Site Settings > Subscriptions > Actions > Delete.
Important! Instead of deleting a product, we suggest changing its status to OFF.
Subscriptions 
- If your customer acquisition model is the Trial Period with subscription, Easy Forms offers you a pricing table on the landing page that has a button to redirect to the registration page. When the user sign up, they will be immediately redirected to the page to confirm his subscription with the payment gateway (Stripe or PayPal).
- If the user confirms his subscription, he will immediately access the features that correspond to the plan selected on the landing page.
- If the user does not confirm his subscription, he will be keep his account but only to confirm his selected plan or another plan. He won't have access to any features until he subscribe a plan.
- If your customer acquisition model is Freemium or Trial Period without subscription. The Landing Page will display the Sign Up link. Then, the user will be able to sign up to the application at any moment, after that he will have access to all the features that you have defined for the Default User Role. From his user account he can subscribe to a plan at the time.
Subscribe a Plan 
Follow the next steps:
- To subscribe a plan, the user should click his Username > Account > Subscription.
- Select a Plan and click Subscribe
- Confirm the selected plan by using the Payment Gateway (PayPal or Stripe).
This process should take some seconds. After that, he will see the information related to his subscription. He will be able to change his subscription or cancel it at any time.
Change Subscription (Upgrade / Downgrade) 
Before updating a subscription plan, remember that it must be compatible with the plan you have defined in PayPal or Stripe.
- PayPal considerations
There are two details that you must take into account.
In PayPal you must create only one product. This product (e.g. Form Builder) must contain all the pricing plans that you are going to link in Easy Forms. This is important because you cannot upgrade / downgrade plans for different products. On the other hand, in Easy Forms you can create different products and in each one different pricing plans.
In PayPal, the amount is expressed in units (e.g. 1 is equal to $ 1.00). In Easy Forms the amount is expressed in cents (e.g. 1 equals $ 0.01 and 100 equals $ 1.00).
- Stripe considerations
In Stripe, you must create only one product. This product (e.g. Form Builder) must contain all the pricing plans that you are going to link in Easy Forms. In Stripe, the amount is expressed in cents, so it's compatible with Easy Forms (e.g. 1 equals $ 0.01 and 100 equals $ 1.00).
Cancel Subscription 
To cancel a subscription, the user only has to click the "Cancel" button and confirm his decision. From this moment on, no payment will be made in the future; however, the user will have access and will keep their benefits until the end of the current billing cycle, we call this "On Grace Period".
Cancel Now 
During the grace period, the user will see the "Cancel Now" button to terminate the grace period immediately, that is, the user will lose all the benefits that the subscription offered.
User Billing Information 
This User's information is used to generate the receipts that he can download from his account.
To get to his billing info:
- Log in to his user's account
- Click the username then click Subscription
- Go to the "Billing Information" panel
- Click Billing Information to view or edit his billing info. In this form, he can enter his name, address and tax id.
Payments & Receipts 
Users can download their receipts at any time. In Subscriptions, the user can see the "Receipts" link. When access the "Receipts" section, he will see the list of payments (transactions) with the link to see each receipt in detail. In this page, he can click the Print link to download the receipt as a PDF document.
Landing Page 
The Subscription module offers you a dynamic landing page that shows the link to the dashboard or links to the Sign Up or Login page depending on whether the user is logged in or not.
You can edit the landing page to add links to your social networks and modify what you consider necessary just by editing a file.
In addition, the landing page has a Pricing Table with a Switcher so that you can dynamically offer monthly and annual subscriptions with different prices. That is, you don't have to edit anything. Depending on the products and pricing plans created, the Price Table will be updated and will generate the correct links as starting point of the subscriptions.
Workflow: Select a subscription plan from landing page 
Basically, to subscribe a plan, the user must sign up the application and confirm his subscription with the payment gateway (PayPal or Stripe). However, since there are different User Acquisition Models, we will describe the flow.
1.- A user can create a free account and access the default user role.
Here he can view the subscription plans, and he can subscribe when he considers it necessary.
2.- If the user wants to subscribe to a payment plan, the process is similar. The user is redirected to the Registration Form to create his account. Then, there are 3 workflows: a. After that, an email will be sent to confirm his email address. By clicking on that link he will be shown a welcome message along with the Subscription/Payment Form so that he can confirm/complete his subscription. b. If the confirmation email is not required (Site Settings > Login > Unconfirmed Email: ON), the user will be able to log into the system. Likewise, after logging in, the user will be redirected to the Subscription/Payment Form to confirm/complete his subscription. c. As a registered user, the user can not confirm the selected plan in the landing page, and instead he can go to the list of plans to choose another plan.
3.- If a user confirms a subscription plan, he will change his user role immediately.